It is a commonly used instrument for measuring horizontal and vertical angles. It is used for prolonging a line, levelling and even for measuring the distances indirectly (techeometry). Using verniers angles can be read accurately up to 20³. Precise theodolites are available which can read angles up to even 1³ accuracy. They use optical principle for more accurate instruments. Now a days electronic theodolites are also available which display the angles.
In this article construction and use of vernier theodolite is explained.
Parts of a Vernier Theodolite
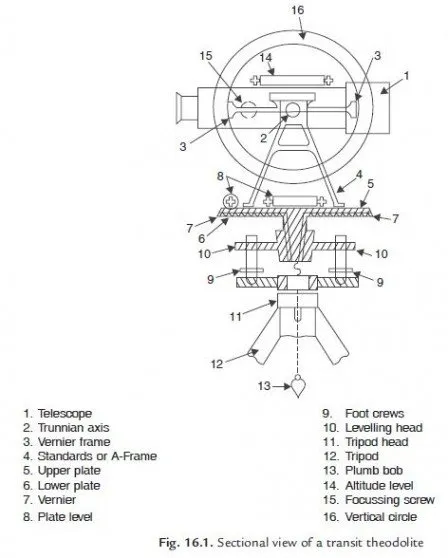
Figure 16.1 shows a sectional view of a typical vernier theodolite and plate 16.1 shows photograph of such theodolite. Main parts of such a theodolite are:
1. Telescope: A telescope is mounted on a horizontal axis (trunnian axis) hence it can rotate in vertical plane. Its length varies from 100 mm 175 mm and its diameter is 38 mm at objective end. Its functions is to provide a line of sight.
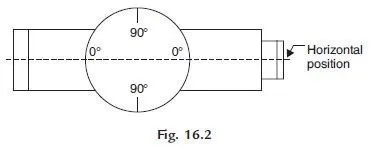
Vertical Circle: A vertical circle graduated up to an accuracy of 20² is rigidly connected to the telescope and hence moves with it when the telescope is rotated in vertical plane. The graduations are in quadrantal system, 0-0 line being horizontal (Ref. Fig. 16.2).
Vernier Frame: It is a T-shaped frame (Fig. 16.3) consisting of a vertical arm and a horizontal arm. With the help of the climping screws the vertical frame and hence the telescope can be clamped at desired angle. Vertical frame is also known as T-frame or index frame.
The vernier arm is known as index arm. At the ends it carries verniers C and D so as to read graduations on vertical circle. They are provided with glass magnifiers. Altitude bubble tube is fitted over the horizontal arm.
Standards or A-Frame: The frames supporting telescope are in the form of English letter A. This frame allows telescope to rotate on its trunnian axis in vertical frame. The T-frame and the clamps are also fixed to this frame.
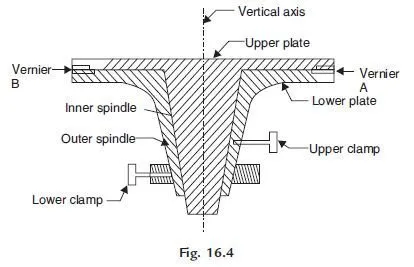
5. Upper Plate [Fig. 16.4]: Upper plate supports standards on its top surface. On lower side it is attached to a inner spindle which rotates in the outer spindle of lower plate. Using upper clamp, upper plate can be clamped to lower plate. Using tangent screws, it is possible to give slight relative motion between the two plates, even after clamping. Two diametrically opposite verniers A and B fixed to upper plate help in reading horizontal circle graduations. They are provided with magnifying glasses.
Lower Plate: The lower plate, attached to the outer spindle carries a graduated circle at its bevelled edge. Graduations are up to an accuracy of 20². It can be clamped at any desired position using lower clamps. If upper clamp is locked and the lower one is loosened the two plates rotate together. If the upper clamp is loosened and lower clamp locked, upper plate alone rotates. This mechanism is utilised in measuring horizontal angle.
7. Plate Level: One or two plate level tubes are mounted on the upper plate. If the two level tubes are provided they will be at right angles to each other one of them being parallel to trunnion axis. These levels help in making the vertical axis of the instrument truely vertical.
8. Levelling Head: It consists of two parallel triangular plates known as tribratch plates. The upper tribratch plate is provided with three levelling screws each one carried by a arm of tribratch plate. By operating screws the levelling of upper plate and hence telescope can be ensured. The lower tribratch can be fitted into a tripod head.
9. Tripod: Theodolite is always used by mounting it on a tripod. The legs of tripod may be solid or framed. At the lower end the legs are provided with steel shoes to get good grip with the ground. The top of tripod is provided with external screw to which the lower tribratch plate can be screwed. When not in use tripod head may be protected with a steel cap, provided for this purpose.
10. Plumb Bob: A hook is provided at the middle of lower tribratch plate from which a plumb bob can be suspended. It facilitates exact centering of the theodolite on a station.
11. Shifting Head: It is provided below the lower plate. In this, one plate slides over another over a small area of about 10 mm radius. The two plates can be tightened in the desired position. It facilitates exact centering of the instruments.
12. Magnetic Compass: In some theodolites a magnetic compass is fixed on one of the strands. It is useful if readings are to be recorded with magnetic north as meridian.
Use of Theodolite
Theodolite is used for measuring horizontal and vertical angles. For this the theodolite should be centered on the desired station point, levelled and telescope is focussed. This process of centering, levelling and focussing is called temporary adjustment of the instrument.
 Measurement of Horizontal Angle
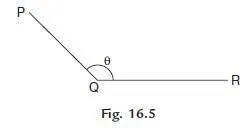
The procedure is explained for measuring horizontal angle θ = PQR at station Q (Ref. Fig. 16.5)
1. Set the theodolite at Q with vertical circle to the left of the line of sight and complete all temporary adjustments.
2. Release both upper and lower clamps and turn upper plate to get 0° on the main scale. Then clamp main screw and using tangent screw get exactly zero reading. At this stage vernier A reads 0° and vernier B reads 180°.
3. Through telescope take line of sight to signal at P and lock the lower clamp. Use tangent
screw for exact bisection.
4. Release the upper clamp and swing telescope to bisect signal at R. Lock upper clamp and use tangent screen to get exact bisection of R.
5. Read verniers A and B. The reading of vernier A gives desired angle PQR directly, while 180° is to be subtracted from the reading of vernier B to get the angle PQR.
6. Transit (move by 180° in vertical plane) the telescope to make vertical circle to the right of telescope. Repeat steps 2 to 5 to get two more values for the angle.
7. The average of 4 values found for θ, give the horizontal angle. Two values obtained with face left and two obtained with face right position of vertical circle are called one set of readings.
8. If more precision is required the angle may be measured repeatedly. i.e., after step 5, release lower clamp, sight signal at P, then lock lower clamp, release upper clamp and swing the telescope to signal at Q. The reading of vernier A doubles. The angle measured by vernier B is also doubled. Any number of repetitions may be made and average taken. Similar readings are then taken with face right also. Finally average angle is found and is taken as desired angle Q. This is called method of repetition.
9. There is another method of getting precise horizontal angles. It is called method of reiteration.
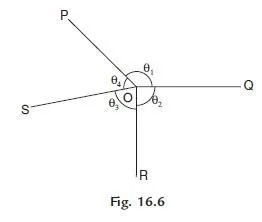
If a number of angles are to be measured from a station this technique is used (Fig. 16.6).
With zero reading of vernier A signal at P is sighted exactly and lower clamp and its tangent screw are locked. Then θ1 is measured by sighting Q and noted. Then θ2, θ3 and θ4 are measured by unlocking upper clamp and bisecting signals at R, S and P. The angles are calculated and checked to see that sum is 360º. In each case both verniers are read and similar process is carried out by changing the face (face left and face right).
Measurement of Vertical Angle
Horizontal sight is taken as zero vertical angle. Angle of elevations are noted as +ve angles and angle of depression as ve angles.
To measure vertical angle the following procedure may be followed:
1. Complete all temporary adjustment at the required station.
2. Take up levelling of the instrument with respect to altitude level provided on the A frame.
This levelling process is similar to that used for levelling dumpy level i.e., first altitude level is kept parallel to any two levelling screws and operating those two screws bubble is brought to centre. Then by rotating telescope, level tube is brought at right angles to the original position and is levelled with the third screw. The procedure is repeated till bubble is centred in both positions.
3. Then loosen the vertical circle clamp, bisect P and lock the clamp. Read verniers C and D to get vertical angle. Take the average as the actual vertical angle.

thanks for your more information about the theodolite and it’s parts!
thanks for accurate information about theodolite given me
Thanks for inform to us….!
Thank for inform us
im verY verY thnkful to u sir good inform for theodolite…:)
thanks for information provided………………!!!!!!!!!!!!!!!
Thanks a lot to you sir for giving clear data about theodolite..
thanks you for the clear info.
thanks
thanks for making me the knowledge about thrdolite