Various methods used for linear measurements may be grouped as:
(i) Approximate
(ii) Using chain or tape
(iii) By optical means and
(iv) Using electromagnetic distance measurement instruments.
12.1.1 Approximates Methods of Linear Measurements These methods are used in reconnaissance survey or to detect major mistakes committed while measuring with better methods. On smooth roads they can give results within 1 per cent error. These approximate measurements may be by:
(i) pacing
(ii) using passometer
(iii) using pedometer
(iv) using odometer or by
(v) using speedometer.
(i) Pacing: In this method surveyor walks along the line to be measured and counts the number of steps. Then the distance measured is equal to number of steps × average length of a step.
Average length of a step can be found by walking along a known length. A normal man takes a step of length 0.75 m to 0.8 m.
(ii) Using Passometer: A passometer is a watch-like instrument which is carried vertically in the pocket of shirt or tied to a leg. It records number of steps taken. Thus the problem of counting number of steps is eliminated in this approximate method of linear measurement.
(iii) Using Pedometer: This instrument is similar to passometer but it can record the distance instead of number of steps. In this, zero setting and setting of step length is made before walking.
(iv) Odometer: This instrument is attached to the wheel of a cycle or other vehicle. It records the number of revolutions made by the wheel. Knowing the circumference of the wheel, the distance travelled may be found.
(v) Speedometer: Odometer calibrated to give distance directly is called speedometer. This is to be used for particular vehicle only. All automobiles are provided with speedometers. By running the vehicle along the line to be measured distance can be found.
12.1.2 Measurement with Chains or Tapes
Measurement of distances using chain or tape is termed as chaining. This is the accurate and commonly employed method in surveying: These instruments can be classified as (i) chain (ii) steel band and (iii) tapes.
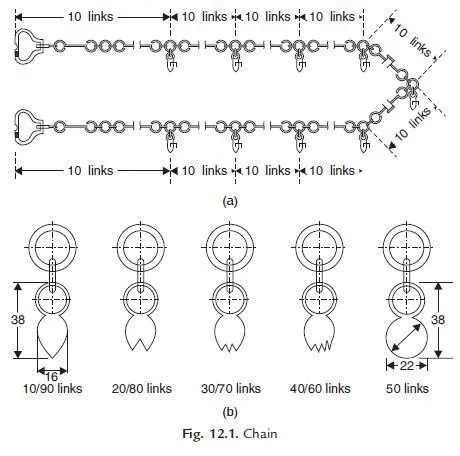
(i) Chains: The chains are composed of 100 pieces of 4 mm diameter galvanised mild steel wires bent into rings at the end and joined to each other by three circular or oval shaped rings. These rings give flexibility to the chain. The ends of chains are provided with swivel joints (Ref. Fig. 12.1(a)),
so that the chain can be turned without twisting. To facilitate easy reading of the chain, brass tallies are
provided. End of 10th link from each end is provided with a talley of one tooth, 20th link is provided
with a talley of two teeth; 30th link with a talley of three teeth; 40th link with a talley of 4 teeth and the
middle of chain is provided with a talley of circular shape [Ref. Fig. 12.1(b)].
It is to be noted that
(i) length of a link is the distance between centres of two consecutive middle rings.
(ii) the length of the chain is from outside of one handle to the outside of the other handle.
Commonly used metric chains are of 20 m length. They have 100 links with talleys at every 2 m.
Each link is of 0.2 m length. Simple rings are provided at every one metre length except wherever tallies are provided. The total length of chain is marked on the brass handle.
However 30 m chains are also in use. Length of each link is 0.3 m. It is not so convenient as 20 m chain to read, since no rings can be provided at one metre distance and each link needs multiplication with 0.3 to arrive at metre units. However as a result the influence of using 100 ft chain in olden days, this type of chain are also in market.
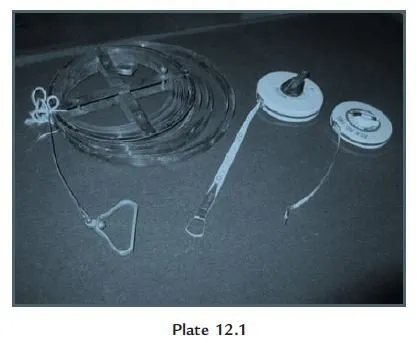
Steel Band: It is also known as band chain. It consists of steel of 12 to 16 mm width and 0.3 to 0.6 mm thickness. The steel ribbon is wound around an open steel cross or in a metal reel (Ref. Plate 12.1).
Metric steel bands are available in lengths of 20 m and 30 m. Any one of the following two methods of markings are used:
(i) Providing brass studs at every 0.2 m and numbering at every metre. Last links from either end are subdivided in cm and mm.
(ii) Etching graduations as meters, decimeters and centimeters on one side of the band and 0.2 m links on the other side.
Tapes: Depending upon the materials used, they are classified as:
(i) cloth or linen tape
(ii) metallic tape
(iii) steel tape and
(iv) invar tape.
(i) Cloth or Linen Tape: 12 to 15 mm wide cloth or linen is varnished and graduations are marked. They are provided with brass handle at the ends. They are available in length of 10 m, 20 m, 25 m and 30 m. These tapes are light and flexible. However because of the following disadvantages they are not popular:
(i) Due to moisture they shrink.
(ii) Due to stretching they extend.
(iii) They are not strong.
(iv) They are likely to twist.
(ii) Metallic Tape: They are made up of varnished strip of waterproof linen interwooven with small wires of brass, copper or bronze. End 100 mm length of tapes are provided with leather or suitable strong plastic materials. Tapes of length 10 m, 20 m, 30 m and 50 m are available in a case of leather or corrosion resistant metal fitted with a winding device. Red and black coloured markings are used for indicating full metres and its fractions in centimetres. A typical metallic tape is shown in Fig. 12.2. These tapes are light, flexible and not easily broken. These tapes are commonly used in surveying.
(iii) Steel Tape: A steel tape consists of 6 to 10 mm wide strip with metal ring at free end and wound in a leather or corrosion resistant metal case. It is provided with a suitable winding device. Tapes are marked indicating 5 mm, centimetres, decimetres and metres. The end 10 cm length is marked with millimetres also. 10 m, 20 m, 30 m, or 50 m tapes are used in surveying. Figure 12.3 shows a typical steel tape (Ref. Plate 12.1 also). Steel tapes are superior to metallic tapes as far as accuracy is concerned.
However they are delicate. Care should be taken to wipe clean before winding. They should be oiled regularly to prevent corrosion.
(iv) Invar Tape: Invar is an alloy of nickel (36%) and steel. Its coefficient of thermal expansion
is low. Hence errors due to variation in temperature do not affect measurements much. The width of tape is 6 mm. It is available in length 30 m, 50 m and 100 m. It is accurate but expensive.
12.1.3 Measurements by Optical Means
In this system, the telescope of the angle measuring instrument called theodolite (to be explained in Ch. 16) is provided with two additional cross hairs at a and b which are at distance i [Ref. Fig. 12.4].
To measure distance D between two point P and Q instrument is set at P and a graduated staff is held vertically at Q and vertical intercept AB is recorded. Then distance D can be computed as explained below:
k and c are constants for a given instrument and hence can be found once for all. Thus distance between P and Q can be found by measuring vertical intercept s. Thus distance is measured by optical means easily. This is called Tacheometric measurement. But this measurement is not that accurate as obtained by measuring with chain or tape. For details of this method of survey, reader has to refer specialised books on surveying and levelling.
12.1.4 Linear Measurement with Electromagnetic Distance Measurement Instruments Nowadays for measuring distances electronic equipments called electromagnetic distance measurement (EDM) instruments have come in the market. They rely on the measurement of electromagnetic waves and measuring even fraction of wavelength by phase difference technique. They even display the distance measured. They are costly and delicate. Hence for ordinary surveying they are not used commonly. The details of such measurements are considered beyond the scope of this course.


I will need more meaning and an explanation under this method (EDM)
THANK YOU;;;;;;;;;